Mobility is your joint ability to move around through its full range of motion, before being restricted by the surrounding ligaments, tendons, and muscles. This is different from flexibility which is your muscle’s ability to go through a lengthened position at will. Mobility focus on the joints, flexibility on the muscles, and also flexibility can be used to improve mobility although they are not the same.
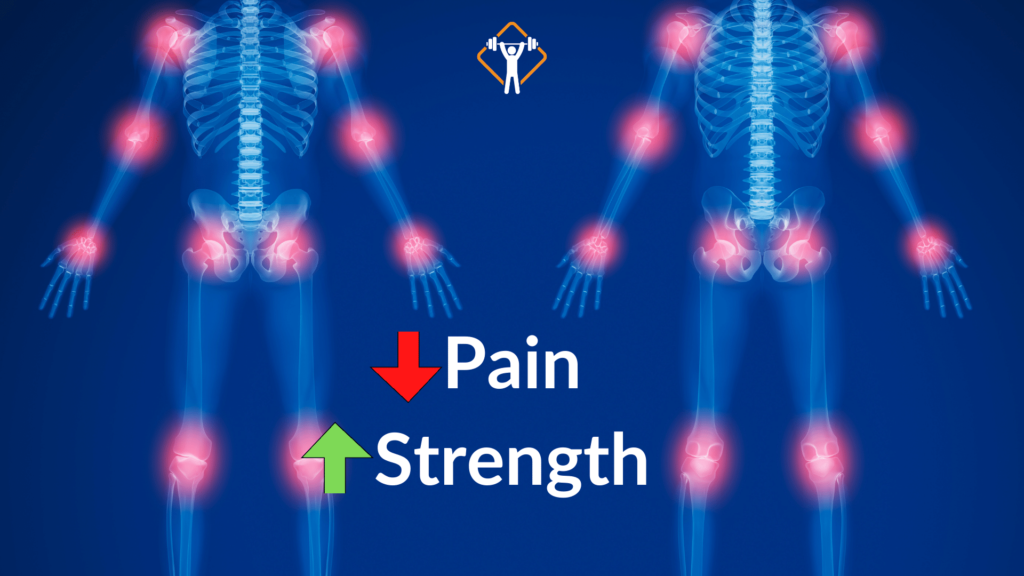
Improved mobility will not only help you use your joints through a greater range of motion, but it’s also going to help you:
- Have healthier joints.
- Improve posture.
- Less aches and pains.
- Less stiffness.
- Better muscle use.
Squat deeper, bench press, heavier jump, higher, or whichever athletic activity you want to do, mobility will help you achieve that.
If you don’t have mobility in your joints, you can’t use them to their fullest capacity.
Instead of trying to work with immobile joints, and improve mobility, so that you can improve your strength, it would also help you improve your force output, and get better workouts.
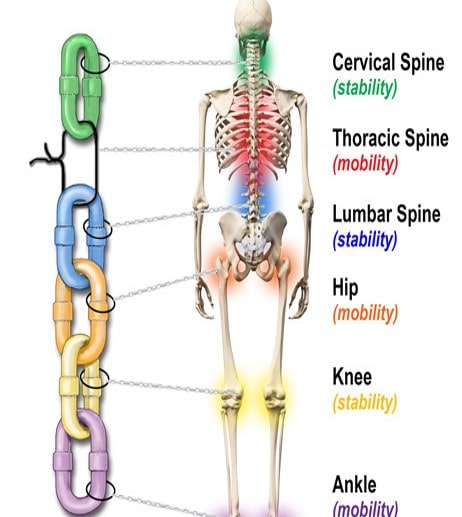
Not all joints are meant to be mobile, there is something called the mobility stability continuum and certain joints are meant to be stable. They have a fixed range of motion and others are meant to be mobile while moving through greater ranges of motion.
We’ll go through all the major joints in the body, you’ll notice that your joints alternate in function between stability and mobility.

We’ll go from the bottom up:
- Your ankles are meant to be mobile.
- Your knees are meant to be stable.
- Your hips are meant to be mobile.
- Your lower back is meant to be stable.
- Your thoracic spine (middle back) is meant to be mobile.
- Your shoulder blades are meant to be stable.
- Your shoulders are meant to be mobile.
- Your elbows are meant to be stable.
- Your wrists are meant to be mobile.
The difference is evident using these joints, your ankles and hips can move through different planes of movement because they’re meant to. The problem with a lack of mobility is that if one joint on the mobility stability continuum isn’t as mobile as it should be, the stable joints will have to work overtime to make up for that lack of mobility.
A lot of people will experience knee pain or low back pain, the problem isn’t with the low back or tIe knees. It’s usually due to a lack of mobility at the hips, at the ankles, or at the thoracic spines i.e the joints immediately above and below it. If you find yourself with any kind of joint pain, it’ll help to improve the mobility of not just that joint in particular, but the joints around it as well.
How do we use the importance of mobility to improve our training sessions?
Note that before you get started with training, knowing what you’re going to work out and knowing what joints are going to be used is going to be helpful. This is to allow you to get the most out of the exercise as you perform it.
If you know you’re going to be squatting, for instance, start your workout with some ankle mobility, hip mobility, and even shoulder mobility, that’s going to be what’s holding the bar up.
It can help you get a more effective squat because you’ve already primed your joints to be able to move through a greater range of motion before you’ve added any load to it.
Also, with the upper body, if you’re doing a bench press or an overhead press, making sure that your shoulders and wrists are ready to take on a load, and go through a full range of motion will help you get more out of your bench press on that day, it can be specific to the day, or you can choose to mobilize all your joints in one day, which I typically recommend, especially if you have the time for it. This will help improve your mobility in the short term but also in the long term as well. To improve your mobility overall, you need to actually practice mobilizing your joints to get better at it.
Just like you need to practice bench pressing to get better at bench pressing and bench press more weight. Before going through the main joint mobility exercises, it’s important to remember how to do these exercises to get the most out of them. You don’t want to be moving through these joints as fast as you can or doing them for reps. You want to concentrate on the range of motion, moving slowly and deliberately, and with purpose because these exercises can only be as effective as your attention to them.
If you’re going through them mindlessly, you won’t get much benefit out of it, if you’re really focusing on feeling, your muscles move, feeling your joint flex, feeling it rotate through a full range of motion, and understanding what it’s going through. You’re going to get so much more out of the movement.
Remember, before starting with any of these exercises, give them your full focus for every single rep that you do, because that’s how you’re going to actually improve your mobility over time.
Mobility Exercises For Each Joint
Ankles
Let’s start from the bottom and make our way up with the ankles. My ideal mobility exercise is always the half-kneeling, ankle mobility exercise.
This is a great one because it really pushes you to get through a full range of motion, and it’s really easy to do. You could do it anywhere, and at any time. The goal is to try to get your ankle and shin angle as small as possible. That means driving your knee forward past your toes, as far as you can, and keeping that heel flat on the ground at the same time. You don’t want your foot flexed as you come up, this is because that’s not really challenging the ankle anymore as much as it’s challenging muscles in your foot.
This looks like getting in a half-kneeling position, having 90-degree angles in your knees, driving your one knee forward past your toe as far as you can, holding that position for a couple of seconds, and then bringing it back before repeating again. You want to make sure that your hips are square as you do, this is because otherwise, you’ll get an inaccurate gauge for how mobile your ankles end up being. You can make this exercise more challenging by adding a weight on your thigh to push the knee forward, but the same principles apply either way.
KEY POINTS
- Make sure your foot is flat.
- Make sure you’re driving your knee forward.
- Make sure your hips stay square.
- Do the three to five reps for each leg, before your leg day, or even in between sets.
Hip mobility
My ideal exercise for hip mobility is shin boxes. I like shin boxes a lot because they challenge a lot of the different movement patterns all at the same time. Your hip does a lot of things: It rotates, it extends. it abducts, it adducts, and it goes sideways. We want to make sure that it can move properly through all those planes at once.
You’re starting in a position on the ground, but on the floor and your knees are in a 90-90 position. From this position, you are to make sure you’re sitting tall, your tailbone is on the floor, and you’re going to rotate to one side as far as you can, and hold that for a few seconds before rotating to the other side, and repeating to really push the rotation of your knees.
Then while twisting your upper body, make sure that your knees, shins, and feet, stay on the floor the entire time you want to make as much contact with the ground as you can. If you can’t quite get your entire leg, making contact with the ground yet that’s okay just push as far as you can, and over time it will get better before switching sides. I personally like to add extra force rotation for both legs, so picking up your shin, getting it as high the ground as you, can really get a good stretch in your hip flexor/groin area and bring it back down. Repeat that with both legs, one will usually be higher than the other, and that’s completely normal. Then switch your shin boxes to the other side, and repeat that process so shin boxes do a good job of mobilizing the rotation aspect of your hips as well as the abduction and adduction aspect of your hips.
Mobilizing the flexion and extension aspect of your hips I like to go through the hip flexor stretch as I like to call it.
Place One foot on an elevated surface, and you’re driving your hips forward as far as you can with one arm up above you. As you drive your hips forward, you’re going to feel a good stretch in your hip flexor and you need to exhale to really get the full release of your hip flexor as you do this. While you exhale, start laterally flexing your torso away from your hip, and toward the leg that’s on the floor, hold that position for a few seconds while strongly exhaling, and repeat for two to three reps, before switching sides.
Thoracic Spine
The next joint that we’re going to be trying to mobilize is going to be your thoracic spine. What I like to focus on with the thoracic spine is improving rotational mobility more than anything else.
Here you’re going to start in a quadruped position with both knees down on the ground, hands under your shoulders You’re going to take one arm and reach through as far as you can across your body but the important thing here is to keep your hips square to the ground. When you twist your hips, the rotation doesn’t come from your thoracic spine anymore, it’s coming from your hips.
We want to make sure that only your thoracic spine is rotating, your shoulders can twist sideways, but your hips stay facing the floor. There needs to be that separation there. Reach as far as you can, do a few pulses to get an extra long reach, and then once you’re done with that, switch sides and repeat for the same number of reps.
Shoulder joint
The banded giant set is one of the best overall shoulder mobility exercises and is a staple in my upper body warm-up routine.
You’re going to grab a band, just a little bit wider than shoulder-width apart, the closer together, the more challenging it’s going to be. Start wider and work your way in, you’re going to try and keep your elbows straight, and raise your arms overhead then bring them around your back, until the band touches the back of your thigh, and then bring it back forward to the starting position, until the bands touch the front of your thigh. Repeat that
for about 10 reps with full control. You don’t want to just flap your arms down to your thigh in either direction, maintain control
maintain the pace, and really feel your shoulder move through its full range of motion.
Wrist
A great wrist exercise that you can do at any time of day is wrist CARs.
CARS stands for controlled articulated rotations, and it’s just taking your wrist, flexing it as far as you can, keeping your forearm stable, and rotating it through the full range of motion, in a slow and controlled manner.
You’re going to do that in both directions for about five reps, and you’re really trying to challenge how far you can move your wrist without assistance, the more often you do it, the further you’ll be able to move it over time.
Another great one that adds strength around the wrist joint is the PAILs and RAILs exercise.
Pails and rails with your wrists You can do this on a table, on the floor, or anywhere you want, but you’re going to start with your palms on the table. keep straight elbows, and start with your shoulders directly above your wrists. You’re going to reach forward with your shoulders, lean forward so that your wrists are starting to get flexed and you’re going to push your hands into the ground, while you do this.
This is going to challenge not only your wrists but the forearm muscles that connect from your wrists to your elbows to help get a good stretch and strengthen that joint as well. Rock back after pushing for a few seconds, repeat that a couple of times, and then you need to do it in the other direction as well, so instead of having your palms on the surface you’re going to have the back of your hands on the surface.
You’re going to be rocking backward to get a greater stretch, and you are going to drive your hands into the ground the same exact way that you did before, just using the back of your hands again, repeat that for a couple of reps, and now with all of these different mobilizing exercises, you have a really good foundation for a warm-up for your next workout day, whether it’s an upper body or lower body day to help get the most out of it.
I highly encourage everyone, if you have wrist pain, shoulder pain, hip pain, knee pain, or ankle pain, do all of these exercises in your free time, whenever you get a chance, the more you do it the more mobile your joints will get, the better you’ll feel on a day-to-day basis, and the more effective your training sessions are going to be.


